
Table of Contents
- Why Your Gutters Are Dripping Behind the Fascia Board
- How to Install Drip Edge Flashing Correctly
- Signs of Rotted Fascia Board and What to Do
- Understanding Capillary Action and Water Infiltration
- Gutter Pitch and Slope: Getting the Angle Right
- Preventing Ice Dams in Winter
- DIY Inspection Versus Professional Assessment
- Frequently Asked Questions
Last Updated: October 4, 2026
Why Your Gutters Are Dripping Behind the Fascia Board
Water from gutters dripping behind fascia isn’t just annoying, it’s a warning sign. When gutters drip behind fascia, moisture seeps into the wood, causing rot that can compromise your entire roofline.
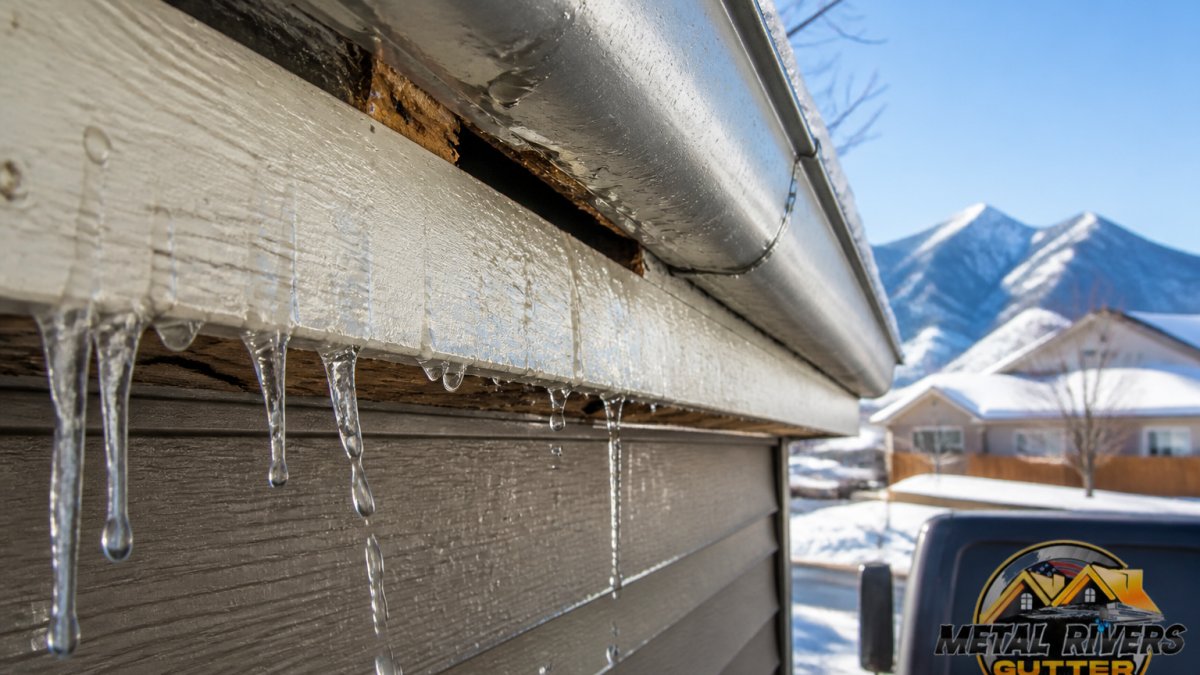
Usually it’s one of three things: gutters not sitting flush against the fascia, water pooling instead of flowing toward the downspout, or drip edge flashing installed incorrectly.
Here’s what matters most: this damage accelerates in winter. Ice dams form when heat escapes through your roof, melting snow that refreezes at the eaves.
Common causes of water infiltration
The most frequent reason gutters drip behind fascia is that the gutter isn’t sealed properly where it meets the fascia board.
Capillary action makes this worse, water climbs upward through the wood grain, pulling more water into the structure even when the initial leak seems small.
Debris buildup is another major cause. Regular gutter cleaning prevents this buildup before it becomes a problem.
Poor gutter pitch is the silent killer. If your gutters slope the wrong direction or don’t slope enough, water pools instead of draining. Pooled water sits there, looking for escape routes, and it always finds them.
Why this happens faster than you’d think
Wood rot moves quickly once it starts. Fascia boards are typically made from pine or spruce, softer woods that absorb moisture like a sponge, softening and weakening within one season of consistent water exposure.
Freeze-thaw cycles accelerate everything. Each winter cycle pushes trapped water deeper into the wood, cracking the grain and opening new pathways for more water to follow, causing structural damage by spring.
The real danger is that rot happens on the back side of the fascia board, hidden from view. By the time you notice sagging gutters, peeling paint, or soft spots, the damage is often extensive.
How to Install Drip Edge Flashing Correctly
Drip edge flashing is your first line of defense. This metal trim sits at the edge of your roof, directing water into the gutter instead of behind the fascia. When installed right, it solves most of the water infiltration problems we’ve been discussing.
Step-by-step installation process
Step 1: Remove the old flashing (if replacing)
Pry off the existing drip edge carefully, remove all fasteners, and clean away old sealant or debris.
Step 3: Position the drip edge
The drip edge should sit on top of the roof shingles and extend into the gutter.
Step 4: Secure with fasteners
Use galvanized or stainless steel screws or nails spaced 16 inches apart to keep the flashing in place during wind and ice storms.
Step 5: Seal the joints
Apply silicone sealant where sections of flashing overlap and where the flashing meets the fascia board.
Step 6: Test the installation
Run water from a hose along the roofline. Watch where it flows.
The gap between your gutter and fascia should be no more than an eighth-inch. If it’s wider, shim the gutter forward with metal brackets before installing the drip edge. A perfectly sealed system starts with proper spacing.
Common installation mistakes that cause leaks
The biggest mistake is installing drip edge without sealing the overlap points. Water will find the seams if they’re not sealed, causing gutters to leak despite looking perfect from the ground.
Another common error is using the wrong fastener type. Aluminum fasteners corrode quickly when they contact copper gutters, use stainless steel or galvanized fasteners instead.
Some installers position the flashing too high on the fascia. If it sits too far up the board, water spills past it and runs down the fascia anyway.
Signs of Rotted Fascia Board and What to Do
Fascia rot is serious. It weakens the structural support for your gutters and roof edge. Catching it early means a simpler repair.
Visual and structural warning signs
Peeling or bubbling paint on your fascia board often signals moisture underneath, don’t just repaint, find the water source.
Soft spots are a dead giveaway. Use a screwdriver or awl to probe the fascia board, if the tool sinks in easily, you’ve got rot.
Sagging gutters are another sign. When the fascia board rots, it loses its strength. The gutter, which is heavy when full of water and debris, pulls away from the rotted wood.
Visible gaps between the gutter and fascia board indicate movement. The fascia is shifting as it weakens, breaking the seal you worked to create. Once this happens, water accelerates the rot cycle.
Repair versus replacement decisions
Small rot spots can sometimes be repaired by cutting out the damaged section and splicing in new wood, but this is a temporary fix.
Most fascia rot requires full board replacement. A rotted fascia board can’t support your gutter system properly, and water will find new paths behind it. If you’re facing extensive damage, gutter and downspout repair or even new gutter installation might be the best long-term solution.
When you replace fascia, use pressure-treated lumber or composite material that resists moisture, these last decades longer than standard pine.
Never ignore soft fascia. The problem only gets worse. Winter freeze-thaw cycles will accelerate rot exponentially. What starts as a small repair becomes a full roof edge replacement if you wait.
Understanding Capillary Action and Water Infiltration
Capillary action pulls moisture deeper into the wood, even when the initial leak is tiny.
Water molecules pull others along through the wood grain against gravity, the narrower the space between fibers, the stronger the capillary pull.
Even a pinhole leak can cause serious damage, capillary action spreads it throughout the board, causing rot across several feet of fascia within weeks.
The best defense is prevention: seal all gaps, maintain proper gutter pitch, and ensure your drip edge flashing is installed correctly. Once water gets behind your fascia, capillary action makes it nearly impossible to stop without removing the affected wood.
Gutter Pitch and Slope: Getting the Angle Right
Your gutters need to slope toward the downspout, pitch is one of the most commonly overlooked installation details, and improper slope causes water to pool, overflow, and leak behind your fascia.
The standard pitch is one-quarter inch of drop per 10 feet of gutter length. This gentle slope is enough to keep water moving without creating visible sagging.
Check your gutter pitch by running water from a hose. If water pools anywhere instead of moving smoothly toward the downspout, the pitch needs adjustment.
Adjusting pitch means loosening the gutter hangers and shimming them to raise or lower the gutter, even a half-inch difference in height changes how water flows.
Preventing Ice Dams in Winter
Ice dams are a northern problem that gutters help prevent when working right. An ice dam forms when heat escapes through your roof, melting snow that refreezes at the cold eaves, trapping more water behind it.
How ice dams form and damage your gutters
The cycle starts with heat loss, your attic is warmer than outside air, so snow melts, flows down, and refreezes at the cold overhang, growing the ice dam and trapping more water above it.
Trapped water seeps under the shingles, through the roof deck, and into the attic and walls.
Ice dams also form in your gutters when water pools and freezes. If your gutter is compromised, sagging, leaking, or not pitched correctly, water backs up, overflows, and runs down the fascia board.
Gutters dripping behind fascia during an ice dam event cause accelerated damage as the repeated freeze-thaw cycle pushes water deeper into the wood every day.
Winter maintenance steps to protect your roofline
Keep your gutters clear before winter by removing leaves and debris in late fall. A clean gutter drains water faster, reducing backup and freezing. If you have heavy tree coverage, clean gutters twice, in October and November.
Ensure proper attic ventilation with soffit and ridge vents. Good ventilation keeps your attic cooler, reducing the melting that triggers ice dams.
Check your gutter slope before winter arrives by testing the pitch with a hose in fall, and adjust if needed.
Install gutter guards to reduce debris buildup, which means less water pooling and freezing, and faster drainage during warm spells. An Upgraded 540 micron gutter guard keeps leaves and pine needles out while allowing water to flow freely, even during heavy snow melt.
The best defense against ice dams is a gutter system that drains water fast and doesn’t leak. That means proper pitch, no debris, and a tight seal where the gutter meets the fascia. When winter hits, you’ll be glad you invested in the details.
DIY Inspection Versus Professional Assessment
A professional inspection is worth the investment, we can see hidden rot, flashing problems, and structural issues, plus we have equipment to safely access your roof and gutters.
A DIY inspection is feasible if you’re comfortable on a ladder and your roof is low-slope.
Metal Rivers Gutter Company offers a free gutter inspection. We’ll identify the source of your leak, assess the damage, and recommend the best fix.
| Inspection Type | Cost | Time | Best For |
|---|---|---|---|
| DIY visual check | Free | 30 minutes | Initial assessment, simple problems |
| Professional inspection | Free (at Metal Rivers) | 1 hour | Accurate diagnosis, hidden damage |
| Thermal imaging | Additional cost | 1-2 hours | Finding heat loss, ice dam causes |
Water dripping behind your fascia board is a fixable problem, if you catch it early. The key is understanding what causes it and acting before the damage spreads.
If you’re dealing with fascia leaks or suspect hidden damage, get a professional assessment.
Frequently Asked Questions
How do I stop water dripping between my gutters and fascia?
Water dripping behind your fascia typically stems from improper drip edge installation, missing flashing, or gutter pitch problems. Start by inspecting where your gutter meets the fascia board, there should be no gap. If the drip edge isn’t seated properly against the roof shingles, water runs behind it instead of into the gutter. Check that your gutter slopes toward downspouts at roughly 1/4 inch per 10 feet. If the slope is flat or reversed, water pools and seeps backward. Clogged gutters worsen this by backing up water that then finds gaps in your system. A professional inspection can pinpoint whether you need flashing repair, gutter re-pitching, or a new installation with proper drip edge placement.
What happens if water gets behind the gutter and rots the fascia?
Water infiltration behind your gutter causes fascia board rot, which compromises your home’s structural integrity and allows moisture to penetrate into the soffit, rafter tails, and eventually the interior walls. Rotted fascia loses its ability to support gutter hangers and spacers, causing the entire gutter system to sag or fail. The damage spreads quickly in freeze-thaw cycles common in winter, water seeps into wood, freezes, expands, and cracks the board further. Once rot takes hold, you’re facing costly repairs: fascia replacement, potential roof decking damage, and interior water damage. Prevention is far cheaper than remediation. Proper drip edge flashing, correct gutter pitch, and regular debris removal keep water flowing where it belongs, away from your fascia and into downspouts.
Can clogged gutters cause water to leak behind the fascia?
Yes. Clogged gutters back up water, raising the water level until it spills over the back edge and runs behind the fascia board. Leaves, twigs, and debris block water flow, especially in tree-dense areas where pine needles and branches accumulate quickly. When gutters overflow, water doesn’t drain into downspouts, it finds the path of least resistance, which is often the gap between your gutter and fascia. In winter, clogged gutters freeze solid, trapping water that then melts and seeps backward. Regular gutter cleaning prevents this. For properties with heavy tree coverage, a gutter guard system can reduce debris accumulation and keep water flowing freely, protecting your fascia from standing water and infiltration.
Should the drip edge be tight against the fascia board?
The drip edge should sit snugly against the fascia board with no visible gaps, but ‘tight’ means properly secured, not forced or bent. The drip edge must be nailed or fastened every 12 to 16 inches to stay in place and maintain its water-shedding shape. If the drip edge pulls away from the fascia or sits loose, water runs behind it instead of over it. The edge should slope slightly outward to direct water away from the fascia and into the gutter. Improper fastening or undersized fasteners allow the drip edge to move with wind and temperature changes, creating gaps where water infiltrates. A professional installation ensures the drip edge is positioned correctly, fastened securely, and sealed where it overlaps to prevent wind-driven rain from finding its way behind your fascia.